The Silca Ultimate Chain Wax System, when used in conjunction with Silca’s own Secret Chain Blend Hot Wax and StripChip Hot Melt Chain Degreaser, will allow you to degrease and wax a new bike chain with no prep and minimal effort.
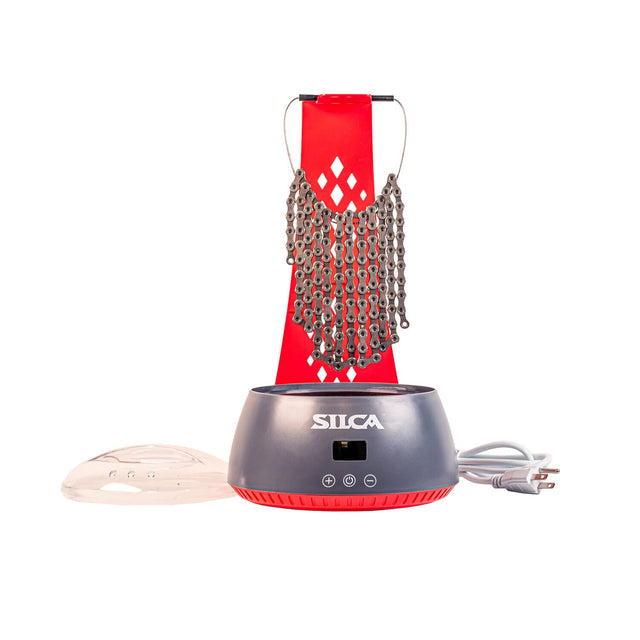
It consists of a Chain Coupler adjoined to a Chain Hanging Stand, plus a Wax Melter. The Wax Melter is positioned within the stand, then filled with 300g of Secret Chain Blend Hot Wax, leaving 20mm at the top of the pot.
If degreasing and waxing together:
Push the temperature beyond its automatic 75°C to 125°C, then once the wax starts to melt, break off one piece of StripChip and place it on top of the wax.
Allow the wax and Hot Melt Chain Degreaser to fully melt, so that the StripChip is no longer visible, then use a cable coupler to lower your chain into the mixture, threading it through five to six links of the chain, spread out to allow a good number of links between each of these. Gently agitate it for 30 seconds, being sure not to spray wax outside the Wax Melter, then let it sit for 10 minutes.
Finally, agitate the chain for another 30 seconds, then lower the temperature of the machine back down to 75°C. Once it reaches that temperature, which should take around 10 minutes, it will be safe to use the cable coupler to remove the chain and hang it to dry on a waxing stand, before turning the Wax Melter off. Allow to cool for 10-15 minutes before handling or installing on your bike.
Please note, it’s easier if you articulate each link before installing, to break down the wax, and it may take 10-20 minutes of pedalling to break in the new chain.
If degreasing and waxing without StripChip:
Degreasing without StripChip requires an extra step and a bottle of Silca’s Ultimate Chain Stripper + Wax Prep. Two options are possible, you can add the Ultimate Chain Stripper to an Ultra-Sonic cleaner for best results or simply find a glass jar with a tight-fitting lid, pour in 29ml of the solution, submerge the chain and shake.
Next, leave to soak for 10 minutes, to allow the solution to penetrate every part of the chain, then agitate again. Pour out the stripper, rinse and agitate in water, then repeat the rinsing process twice more. Finally, remove the chain and dry thoroughly with a microfibre towel before waxing.
Waxing the chain without StripChip
Spread the chain out on the cable coupler, again looping through five or six links and letting the spare chain hang. Lower the chain into the molten wax, which will have melted at the standard 75°C. Allow a portion of the coupler to remain above the surface, though, for easy retrieval.
Agitate the chain in the wax, using the cable coupler, until no more bubbles from trapped air appear, at which point the wax should have fully penetrated between the rollers and pins of the chain. Now, slowly raise the chain and hang it from the drip stand by the cable coupler, to drip into the pot. Again, allow to cool for 10-15 minutes before handling or installing on your bike.
Please note, it’s easier if you articulate each link before installing, to break down the wax, and it may take 10-20 minutes of pedalling to break in the new chain.
Quick link
If your chain has a quick link, this is not suitable for immersion in Hot Melt Wax. If desired, instead apply Silca Super Secret Wax Lube Chain Coating after you have installed the newly waxed chain. Be sure to allow a few hours’ drying time before use after applying on the rollers and pins, though.
Please follow manufacturer’s instructions for quick link usage with your chain.
- System includes:
- Chain coupler
- Chain Hanging Stand
- Wax Melter
- Wax Melter pot capacity is 600ml
- Temperature range is 75-125°C
- Designed exclusively for the waxing of bicycle chains, not to be used for other purposes
- Voltage 110-240V/50-60Hz, power consumption 100W
- Read all instructions before using
- Allow to cool before handling, cleaning or storing
- No need to clean pot after each use, simply remelt leftover wax and use again
- To clean, use cotton or paper towels to wipe clean while unplugged but still warm
Product Information

Choose your roast, grid and frequency to keep ensure every day starts right. Y
Subscribers enjoy up to 20% off our standard coffee price plus from time to time there will be exclusive offers, freebies and competitions.
SAVE MONEY. MODIFY AT ANY TIME. PAUSE, SKIP OR CHANGE
Close all zippers before washing
Wash at max 30°C
Hand washing with cold water (or gentle wash cycle)Using mild, high quality detergent
Drip drying in shade, do not machine dry
Avoiding ironing and bleachThe instructions on your garment’s label
Sorting your clothing by color
Avoiding fabric softener.
Our clothing isn’t meant to be dry cleaned and soaking clothing is not ideal

Storage
Unused sealed sachets should be stored inside the box in a well-ventilated, dry place and protected from moisture, heat and direct sunlight. Can be stored for up to 3 years.
Size
Each sachet contains 30g powder.2 x 30g sachets per carton box.
Makes 2x litres of bike cleaner
100% plastic free packaging
Readily biodegradable ingredients
100% water free
Refill your old bottle and help reduce plastic waste
92% saving in packaging compared to 2 x 1L bike cleaner
100% environmentally friendly ingredients, including plant based raw materials
Supplied in a compostable sachet and printed with vegetable inks
FSC recycled card box containing 2 x sachets – that makes 2L of bike cleaner
Safe on all parts and surfaces including carbon fibre
Will not harm seals, cables, disc brake pads or rotors
Alkaline based and free from alcohol, CFCs, EDTA, solvents or acids
Vegan & vegetarian friendlyCruelty free, not tested on animals

Sachet Instructions
1. Grab your empty old bottle of Muc-Off. (You may need a pair of adjustable pliers to remove the trigger from the bottle). Or purchase our Bottle for Life.
2. Fill up to the shoulders of the bottle with 1 litre of lukewarm water for faster formula activation!
3. Carefully cut one corner of the sachet open along the diagonal cut lines.
4. You can carefully pour the sachet straight into the top of the bottle. Or using the box, fold the inside of the lid together using the printed lines as a guide and use this as a funnel to pour the powder into your bottle. (Please see our video for full instructions on this.
5. Screw your spray trigger back onto the top of the bottle. Ensure it’s tight!
6. Shake the bottle vigorously for 30-60 seconds to activate the formula. If you notice any undissolved powder simply keep shakin’ it!
7. Go clean that filthy bike!
More features